Difference between revisions of "Enumerations"
(→Referring to items: Add link to the References page.) |
(Improved organization ; enhanced presentation of code vs results) |
||
| Line 1: | Line 1: | ||
< [[Structurals]] | < [[Structurals]] | ||
| + | |||
| + | = Overview of commands = | ||
| + | |||
| + | == \startitemize == | ||
The most basic form of using enumerations in ConTeXt is | The most basic form of using enumerations in ConTeXt is | ||
| Line 32: | Line 36: | ||
* <tt>text</tt> (paragraph enumerations, formats the items as a running text). | * <tt>text</tt> (paragraph enumerations, formats the items as a running text). | ||
| − | To change the general layout of enumerations, there is <cmd>setupitemize</cmd>. It accepts an integer as its first parameter to denote for which level of itemization the subsequent settings should apply. | + | == \setupitemize == |
| + | |||
| + | To change the general layout of enumerations, there is <cmd>setupitemize</cmd>. It accepts an integer as its first parameter to denote for which level of itemization the subsequent settings should apply. | ||
| − | + | You will find more about <cmd>setupitemize</cmd> at <cmd>defineitemgroup</cmd>. | |
| − | <texcode> | + | == \defineitemgroup == |
| + | |||
| + | For finer control, it is advisable to create new types of itemization, using the command <cmd>defineitemgroup</cmd> (which unfortunately seems undocumented). For example: | ||
| + | |||
| + | {| | ||
| + | ! width="45%"| | ||
| + | ! width="10%"| | ||
| + | ! width="45%"| | ||
| + | |- | ||
| + | | <texcode> | ||
\defineitemgroup[ltxitm][levels=5] | \defineitemgroup[ltxitm][levels=5] | ||
% | % | ||
| Line 66: | Line 81: | ||
\stoptext | \stoptext | ||
</texcode> | </texcode> | ||
| − | + | | | |
| − | + | | <context> | |
| − | |||
| − | <context> | ||
\defineitemgroup[ltxitm][levels=5] | \defineitemgroup[ltxitm][levels=5] | ||
% | % | ||
| Line 99: | Line 112: | ||
\stoptext | \stoptext | ||
</context> | </context> | ||
| + | |} | ||
| − | = | + | = Customization details and examples = |
| − | + | ==Labels== | |
| − | <context> | + | {| |
| + | ! width="50%"| | ||
| + | ! width="50%"| | ||
| + | |- | ||
| + | |<context> | ||
\starttext | \starttext | ||
\setupitemize[left=(, right=), margin=4em, stopper=] | \setupitemize[left=(, right=), margin=4em, stopper=] | ||
| Line 113: | Line 131: | ||
\stoptext | \stoptext | ||
</context> | </context> | ||
| + | | <texcode> | ||
| + | \setupitemize[left=(, right=), margin=4em, stopper=] | ||
| + | \startitemize[a] | ||
| + | \item one item, | ||
| + | \item next item. | ||
| + | \stopitemize | ||
| + | </texcode> | ||
| + | * <tt>margin</tt> is from left margin to start of item text | ||
| + | * <tt>stopper</tt> is the dot (or whatever) after the "number" | ||
| + | |} | ||
| − | |||
| − | + | ||
| − | + | == Spacing == | |
| − | + | ||
| + | This is the way how you can set spacing before and after itemize when working with | ||
| + | <texcode> | ||
| + | \setupwhitespace[big] | ||
| + | </texcode> | ||
| + | |||
| + | An option '''nowhite''' comes in handy: | ||
<texcode> | <texcode> | ||
| − | \ | + | paragraph before |
| − | + | ||
| − | \item | + | \startitemize[joinedup,nowhite,after] |
| − | \item | + | \item first |
| + | \item second | ||
\stopitemize | \stopitemize | ||
| + | |||
| + | paragraph after | ||
</texcode> | </texcode> | ||
| − | + | These are all the four possible combinations of whitespace settings that you might want to use: | |
| + | |||
| + | <context> | ||
| + | \setuplayout[scale=0.8,width=9cm] | ||
| + | \setupwhitespace[big] | ||
| + | \definesymbol[1][$\triangleright$] | ||
| + | \startcolumns | ||
| + | {\bf joinedup:} \startitemize[joinedup] \item test \item test \stopitemize after \par | ||
| + | {\bf joinedup,nowhite:} \startitemize[joinedup,nowhite] \item test \item test \stopitemize after \column | ||
| + | {\bf joinedup,nowhite,before:} \startitemize[joinedup,nowhite,before] \item test \item test \stopitemize after \par | ||
| + | {\bf joinedup,nowhite,after:} \startitemize[joinedup,nowhite,after] \item test \item test \stopitemize after | ||
| + | \stopcolumns | ||
| + | </context> | ||
| + | |||
| + | ==Multicolumn== | ||
| − | |||
Hans posted a solution to the list for a multicolumn enumeration that counts across then down, instead of down then across. When he posted it (Dec 21, 2005), he said the joinedup option does not work, but he would fix that. This is a version without the tufte and zapf text | Hans posted a solution to the list for a multicolumn enumeration that counts across then down, instead of down then across. When he posted it (Dec 21, 2005), he said the joinedup option does not work, but he would fix that. This is a version without the tufte and zapf text | ||
| − | <texcode> | + | {| |
| + | ! width="45%"| | ||
| + | ! width="10%"| | ||
| + | ! width="45%"| | ||
| + | |- | ||
| + | | <texcode> | ||
\starttext | \starttext | ||
| Line 156: | Line 210: | ||
\stoptext | \stoptext | ||
</texcode> | </texcode> | ||
| − | + | | | |
| − | <context> | + | |<context> |
\starttext | \starttext | ||
| Line 180: | Line 234: | ||
</context> | </context> | ||
| + | |} | ||
| − | == | + | = Other considerations = |
| − | |||
| − | |||
| − | |||
| − | |||
| − | |||
| − | |||
| − | |||
| − | |||
| − | |||
| − | |||
| − | |||
| − | |||
| − | |||
| − | |||
| − | |||
| − | |||
| − | |||
| − | |||
| − | |||
| − | |||
| − | |||
| − | |||
| − | |||
| − | |||
| − | |||
| − | |||
| − | |||
| − | |||
| − | |||
| − | |||
| − | |||
| − | |||
| − | |||
== Randomizing items == | == Randomizing items == | ||
| Line 222: | Line 244: | ||
Example: | Example: | ||
| − | + | {| | |
| + | ! width="45%"| | ||
| + | ! width="10%"| | ||
| + | ! width="45%"| | ||
| + | |- | ||
| + | | <texcode> | ||
| + | \nextrandom | ||
| + | \startitemize[random] | ||
| + | \startitem A \stopitem | ||
| + | \startitem B \stopitem | ||
| + | \startitem C \stopitem | ||
| + | %\startitem F \stopitem | ||
| + | \stopitemize | ||
| + | </texcode> | ||
| + | | | ||
| + | | <context> | ||
\nextrandom | \nextrandom | ||
\startitemize[random] | \startitemize[random] | ||
| Line 231: | Line 268: | ||
\stopitemize | \stopitemize | ||
</context> | </context> | ||
| + | |} | ||
== Referring to items == | == Referring to items == | ||
You can also use a reference to an item, just like a chapter or section. See also [[References]]. | You can also use a reference to an item, just like a chapter or section. See also [[References]]. | ||
| − | + | {| | |
| + | ! width="45%"| | ||
| + | ! width="10%"| | ||
| + | ! width="45%"| | ||
| + | |- | ||
| + | | <texcode> | ||
| + | \starttext | ||
| + | \startitemize[n] | ||
| + | \item A | ||
| + | \item[foo] B | ||
| + | \item C | ||
| + | \stopitemize | ||
| + | \dots | ||
| + | As seen in \in{item}[foo] on page \at{page}[foo], B is teh shizzle. | ||
| + | \stoptext | ||
| + | </texcode> | ||
| + | | | ||
| + | | <context> | ||
\starttext | \starttext | ||
\startitemize[n] | \startitemize[n] | ||
| Line 246: | Line 301: | ||
\stoptext | \stoptext | ||
</context> | </context> | ||
| + | |} | ||
Revision as of 14:03, 29 May 2009
Contents
Overview of commands
\startitemize
The most basic form of using enumerations in ConTeXt is
 \startitemize
 \item here we list the points,
 \item one after the other.
 \stopitemize
The \startitemize command takes optional parameters (see the documentation of \startitemgroup for a complete list), for example a number conversion may be given, with the following predefined types:
| n or N | Usually the default: a numbered list |
| m | A numbered list, with lowercase (“medieval”, aka “oldstyle”) numbers. |
| 1 … 8 | Different kinds of bullets. All items get the same symbol. |
| a | Items are numbered a., b., c., … |
| A | Items are numbered A., B., C., … |
| AK | Items are numbered A., B., C., …, in small caps. |
| r | Items are numbered in lowercase Roman numerals. |
| R | Items are numbered in uppercase Roman numerals. |
| KR | Items are numbered in uppercase Roman numerals, small caps style. |
It is also possible to define your own number conversions; see User-Defined Enumerations. If you have loaded the Chinese module, you can also use c (and some more) for Chinese numbers.
Additional parameters include
- continue (start where the previous itemization was finished, to allow text injections),
- packed (less vertical space between items),
- inmargin (place enumeration symbols into the margin), and
- text (paragraph enumerations, formats the items as a running text).
\setupitemize
To change the general layout of enumerations, there is \setupitemize. It accepts an integer as its first parameter to denote for which level of itemization the subsequent settings should apply.
You will find more about \setupitemize at \defineitemgroup.
\defineitemgroup
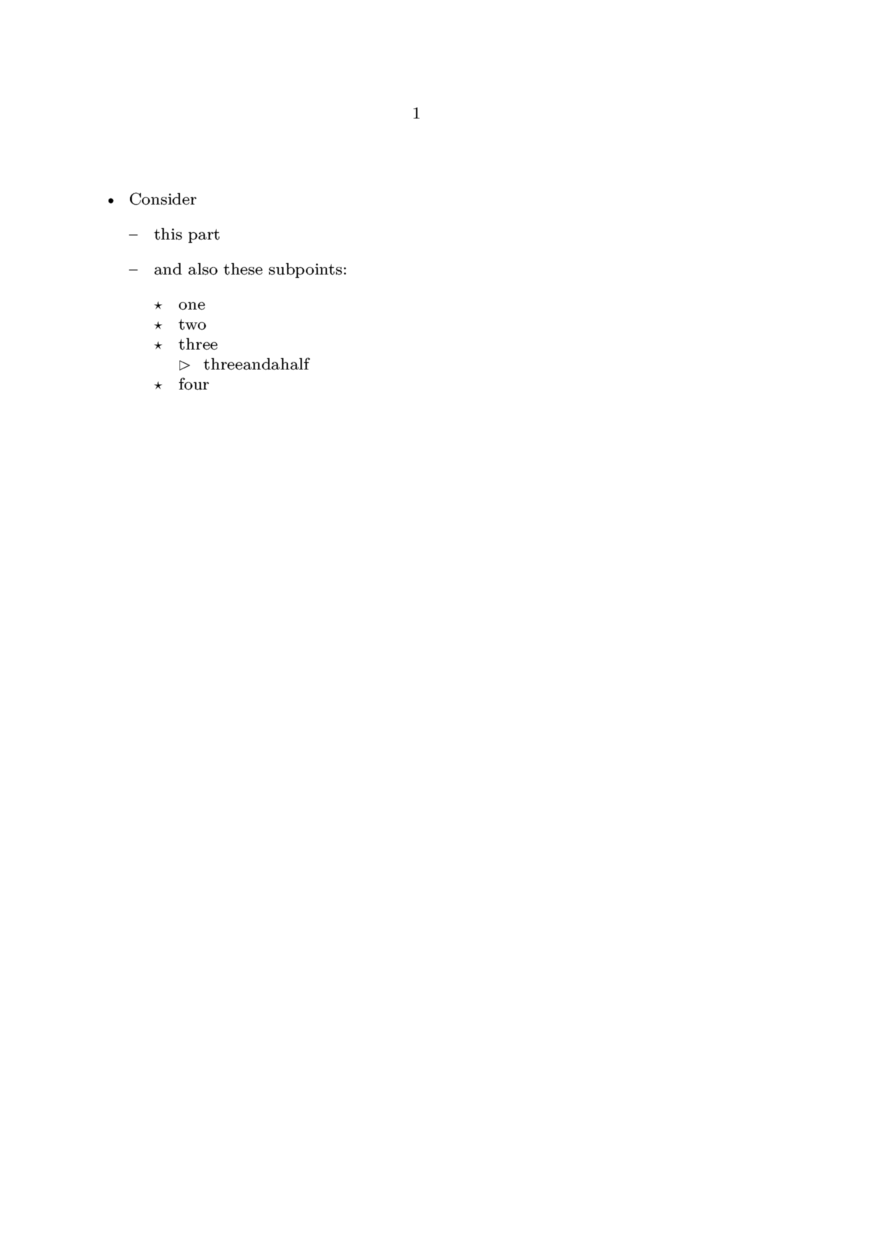
For finer control, it is advisable to create new types of itemization, using the command \defineitemgroup (which unfortunately seems undocumented). For example:
\defineitemgroup[ltxitm][levels=5] % \setupitemgroup[ltxitm][1][1] \setupitemgroup[ltxitm][2][2] \setupitemgroup[ltxitm][3][3,packed] \setupitemgroup[ltxitm][4][4,packed] \setupitemgroup[ltxitm][5][5,packed] % \starttext % \startltxitm \item Consider \startltxitm \item this part \item and also these subpoints: \startltxitm \item one \item two \item three \startltxitm \item threeandahalf \stopltxitm \item four \stopltxitm \stopltxitm \stopltxitm % \stoptext |

|
Customization details and examples
Labels

|
\setupitemize[left=(, right=), margin=4em, stopper=]
\startitemize[a]
\item one item,
\item next item.
\stopitemize
|
Spacing
This is the way how you can set spacing before and after itemize when working with
\setupwhitespace[big]
An option nowhite comes in handy:
paragraph before

\startitemize[joinedup,nowhite,after]
\item first
\item second
\stopitemize

paragraph after
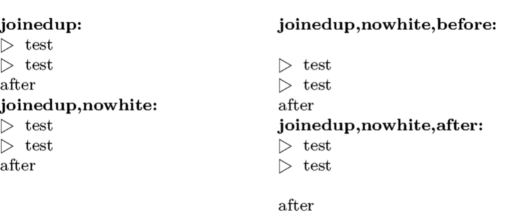
These are all the four possible combinations of whitespace settings that you might want to use:

Multicolumn
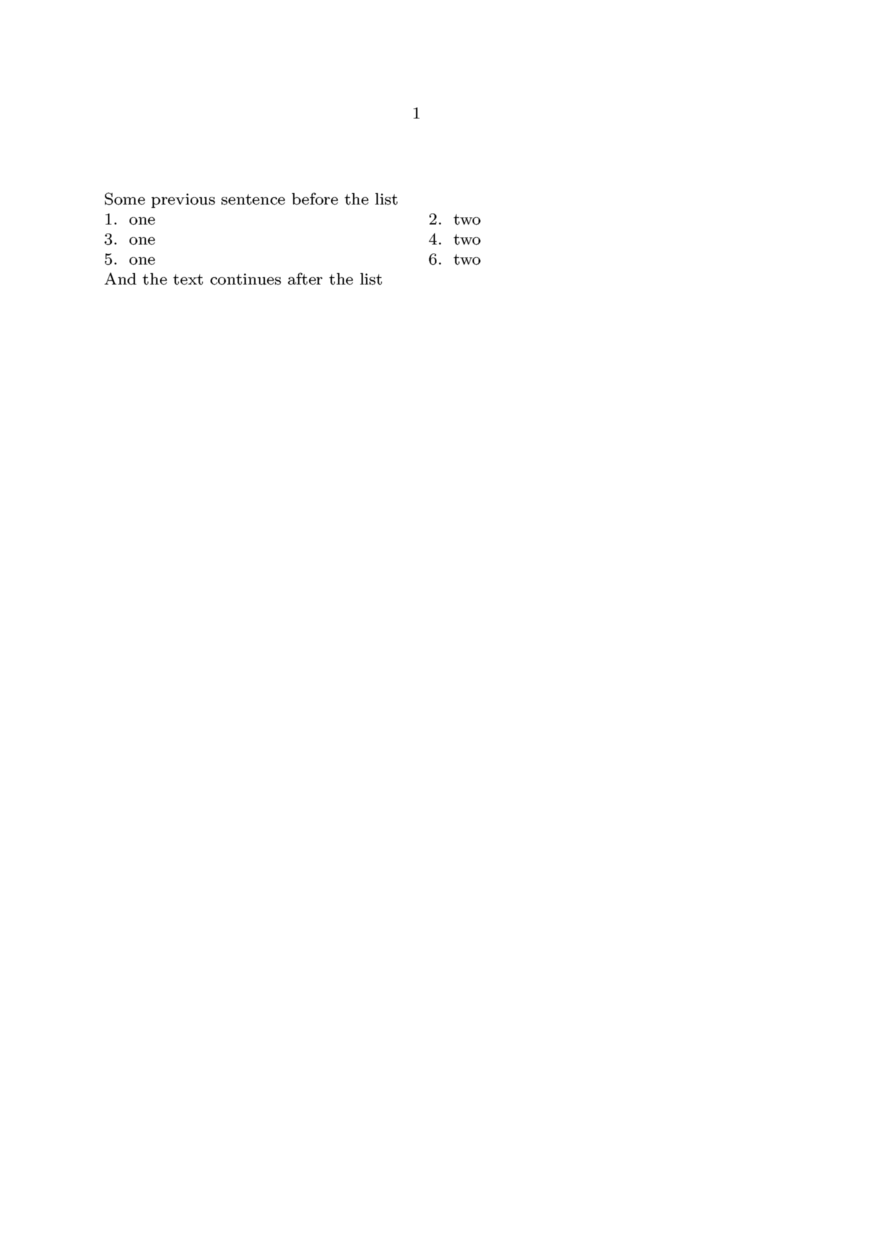
Hans posted a solution to the list for a multicolumn enumeration that counts across then down, instead of down then across. When he posted it (Dec 21, 2005), he said the joinedup option does not work, but he would fix that. This is a version without the tufte and zapf text
\starttext Some previous sentence before the list \startitemize[columns,n,joinedup] \item one \item two \stopitemize \startitemize[continue,columns,joinedup] \item one \item two \stopitemize \startitemize[continue,columns,joinedup] \item one \item two \stopitemize And the text continues after the list \stoptext |

|
Other considerations
Randomizing items
It is possible to make ConTeXt randomize the items in enumerations; this can come handy when, e.g., typesetting tests. You have to add a random option to \startitemize. There are two caveats:
- You have to say \startitem ... \stopitem instead of \item ... .
- Somehow the first item does not get randomized. (I learned from the mailing list - thanks, Aditya! - that adding a \nextrandom somewhere earlier helps.)
Example:
\nextrandom \startitemize[random] \startitem A \stopitem \startitem B \stopitem \startitem C \stopitem %\startitem F \stopitem \stopitemize |

|
Referring to items
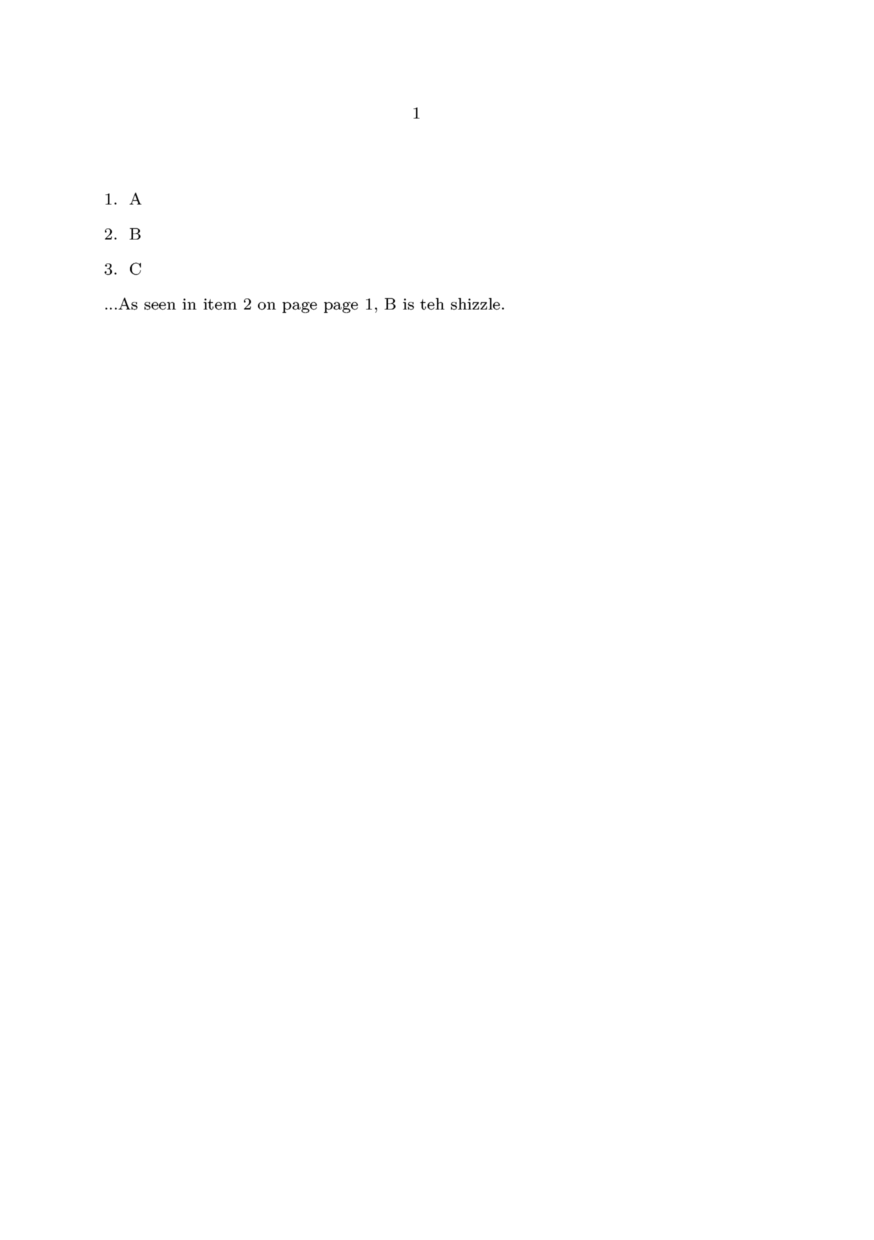
You can also use a reference to an item, just like a chapter or section. See also References.
\starttext \startitemize[n] \item A \item[foo] B \item C \stopitemize \dots As seen in \in{item}[foo] on page \at{page}[foo], B is teh shizzle. \stoptext |

|