User:Sciurus/sandbox
LIKE EVERYTHING IN THIS SANDBOX, THIS IS ONLY A DRAFT AND SHOULD NOT BE USED YET.
Contents
The structure of ConTeXt
ConTeXt has a very logical structure. It has five basic notational conventions:
- square brackets: Enclose arguments to ConTeXt commands in [ ].
- curly braces: Use { } as delimiters to group text as a single self-contained unit.
- start-stop: To apply something to some text, enclose the text in
\startsomething\stopsomething. - setup: To configure something, use
\setupsomething. - define: To create a named customization of something, use
\definesomething.
A minimal example: start-stop and setup notation
To see how these notational conventions get used, let’s start with a minimal example of a ConTeXt document:
\starttext
\input knuth
\stoptext
Compiling this document typesets a built-in quotation from Knuth, which is inserted with \input knuth. (Throughout the ConTeXt documentation, you'll find this and other similarly built-in texts used to illustrate examples.) You can already see start-stop at work: the usual way of processing the entire text of the document is named text, so to apply it you enclose the document text in \starttext \stoptext.
When you compile this document, you'll probably immediately see some things that you want to change. For example, the default paper size in ConTeXt is A4. This works well for most of the world, but if you’re in the United States, you might prefer your paper size to be letter. That’s easy enough: just use \setuppapersize[letter].
\setuppapersize[letter]
\starttext
\input knuth
\stoptext
This example uses the setup notation. The way that paper is sized for a document in ConTeXt is called papersize, so you use \setuppapersize to configure it. The use of [ ] to enclose the argument is an example of the square brackets notation.
Another thing you might like to change is the page numbering. By default, ConTeXt places a page number at the center of the top of the page. To put it at the center of the bottom of the page instead, you can use \setuppagenumbering[location=bottom].
\setuppapersize[letter]
\setuppagenumbering[location=bottom]
\starttext
\input knuth
\stoptext
This is another example of the setup notation. The way that pages are numbered in ConTeXt is called pagenumbering, so you use \setuppagenumbering to configure it. And the use of [ ] to enclose the argument is another example of the square brackets notation.
You also might want to change the way that paragraphs are indented. By default, they are not indented. To make them indented by a medium amount, use \setupindenting[yes, medium]. (Here yes turns the indenting on, but by default the amount is still none, so medium is used to specify the amount.)
\setuppapersize[letter]
\setuppagenumbering[location=bottom]
\setupindenting[yes, medium]
\starttext
\input knuth
\stoptext
The setup notation is being used here again. The way that paragraphs are indented in a ConTeXt is called indenting, so you use \setupindenting to configure it. The use of [ ] to enclose the arguments is again the square brackets notation.
Another example: define notation
Let’s look at another example. Suppose you have a ConTeXt document, and you want to place a box with rounded corners around some text. The way to place boxes around text in ConTeXt is called framed, so (in keeping with the Applying Principle) to apply that type of formatting you enclose the text in \startframed \stopframed. Since you want rounded corners, you specify the argument corner=round for rounded corners too:
\startframed[corner=round]
An example.
\stopframed

As you can see, you put the arguments in with the square brackets notation. But what if you want to make this configuration the default for all of your frames in the document? You can use the setup notation for this. The command \setupframed will make this the default configuration for the rest of the document:
\setupframed[corner=round]
\startframed
An example.
\stopframed

When you have set it up this way, you no longer have to type in the arguments every time you have a box around text. But more importantly, by making this configuration separately at the beginning of your document, you have set up a uniform style throughout your document. This makes it easy to make global style adjustments, which is a very powerful feature.
But what if you want to have two types of frames, one with rounded corners and one without, and you'll be using both of them lots of times? This is where the define notation comes in. You can use \defineframed twice to define two meaningfully named configurations (say definitionFrame with rectangular corners and exampleFrame with rounded corners) that you can refer to throughout your document:
\defineframed[definitionFrame][align=flushleft]
\defineframed[exampleFrame][align=flushleft, corner=round]

\startframed[definitionFrame]
A definition.
\stopframed

\startframed[exampleFrame]
An example.
\stopframed
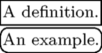
Now if at some later time you want to change the way that you format the frames around your definitions and examples, it is easy to do so. You just change the \defineframed commands where those frame formats are created, and the change will be applied consistently and globally to your whole document.
Example: curly braces notation
You have now seen examples of four of the five notational conventions listed above: all of them except the curly braces notation.
To see one way that the curly braces notation is used, note that enclosing text in \startframed \stopframed is not the only way to put a box around text. Another way, which is really just syntactic sugar for the same thing, is to used the \framed command. This will put a box around the next single unit following it (ignoring whitespace). For example:
\framed {An example.}

This is an example of how curly braces notation is used in ConTeXt. In order to delimit the single unit that follows it, you use { }. Although many of ConTeXt's commands involve start, stop, setup, or define, a fair number of them instead operate on the single unit following them, as \framed does. Some, like \framed, allow you to use either syntax.
Another situation where text needs to be treated as a single unit is when an argument to a command takes some text that involves [ ]. For example, the following code works fine because the text for the section title doesn’t contain [ ]:
\startsection[title=A section title]
\stopsection

However, because the following section title contains [ ], it won’t work unless you do something to tell ConTeXt that those square brackets are not signaling the end of the function’s arguments:
\startsection[title=a[5] and other list elements]
\stopsection

One way to get around this problem is to apply curly braces notation: enclose the title in { } so that ConTeXt will treat the title text as a single unit. Then it works just fine:
\startsection[title={a[5] and other list elements}]
\stopsection

Summary
Naturally not everything in ConTeXt is written using these five notational conventions. There are many further notational details to learn, and not everything in ConTeXt is completely consistent with these conventions. However, the design of ConTeXt really is if not entirely consistent at least highly consistent in using these conventions, so they serve as a useful guide when you are trying to figure out how best to use the powerful tools that ConTeXt offers.
Some commands that use this notation
Here I'll put some commands.