Movie
(this page is a work in progress, this is a compagnon page to a MAPs article about the same subject).
Contents
Introduction
If you wish to make an animation in your document, see the Animation page. This page will explain how to MetaFun to create a mp4 movie. Such movie can be embedded in a presentation, put on YouTube, etc, this will be a real movie !
The steps involved to realize such a movie are to (1) make a pdf such as each page is a frame of the movie, (2) convert the pdf pages to jpeg images, (3) assemble these images into a mp4 movie.
Tutorial
An animation is simply a series of images shown in order, one at a time. The number of images per unit of time determines the speed of the movie, a factor usually referred to as the framerate. For instance, if we generate 300 images, we can create a 10-second movie at 30 frames per second, or a 20-second movie at 15 frames per second.
This tutorial will be to design and animate a movie showing particles moving along circles. The different images needed for the animation will be pages from the same PDF. The general structure of the code is as follows:
\starttext
  \dorecurse{300}{ % Each of the 300 images
    \startMPpage
      % Insert here code to draw an image
    \stopMPpage
  }
\stoptext
An MPpage has the size of the bounding box of all combined objects on the current page, so if objects move within the page, the page size will change. A solution to maintain control is to introduce a frame, which we can visualize as a camera frame. In the following, we refer to this frame as TheFrame. We can keep this frame fixed while subjects move within it, or we can keep subjects steady and move the frame, or even do both! In fact, if we think of a real camera, this is exactly the same concept. Let's consider a fixed square frame here, called TheFrame:
\startMPpage
  path TheFrame ;
  TheFrame := fullsquare scaled 80 ;
  % the code...
  setbounds currentpicture to TheFrame ;
\stopMPpage
It is a good idea to perform declarations and calculations only once, and therefore, to place them in MPinclusions before the drawings are actually done. Since we intend to move a particle along a path, the position of the particle depends on the current frame. This information will be stored in the variable currentframe. In the simplest case, the current frame corresponds to the value of the loop dorecurse, which can be accessed using currentframe := #1;. The position of the object will be determined by currentframe/TotalNbFrames along the path. Now, we are ready for the complete code :
\starttext
\startMPinclusions
 path TheFrame ; TheFrame := fullsquare scaled 80 ;
 path ThePath , TheObject , ObjectInMovement ;
 ThePath   := fullcircle scaled 50 ;
 TheObject := fullcircle scaled 8 ;
 TotalNbFrames := 300 ;
\stopMPinclusions

\dorecurse{300}{
\startMPpage
  currentframe := #1;
  ObjectInMovement := TheObject shifted
    (point (currentframe/TotalNbFrames) along ThePath );
  draw ThePath withcolor blue ;
  fill ObjectInMovement withcolor red ;
  setbounds currentpicture to TheFrame ;
\stopMPpage }
\stoptext
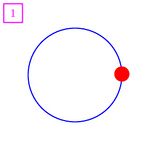
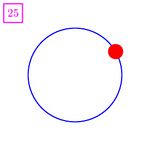
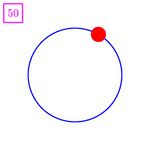
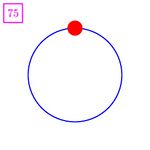
Here are some excerpts of this file (frame number in magenta in the top-left of each image):
The number of frames needed for a movie can be large. For example, consider a five-minute movie at 30 frames per second: we would need 5 x 60 x 30 = 9,000 frames. If there are a lot of calculations for each frame, this could pose an issue. Therefore, during development, it could be useful to speed up the the processes : sometimes, it's possible to speed up or adjust the timing. For instance, assume the loop in the preceding code at line 12 is changed to:
currentframe := (#1-1)*100 ;
if currentframe == 0: currentframe := 1; fi;
The first page of the file will correspond to frame 1, the second to frame 100, the third to frame 200, and the last one, the fourth, to frame 300. This allows us to obtain a rough idea of the movie without generating every single page. However, as will become clear later, this approach is not always feasible.
Now that we have a PDF file, we need to convert the PDF pages to JPG images. This can be easily done with external tools like ImageMagick (https://imagemagick.org), a free open-source software for manipulating digital images. Once installed on your system, the command
convert myfile.pdf p_%03d.jpg
will convert the 300 pages of myfile.pdf to 300 images named p_000.jpg, p_001.jpg, ..., p_299.jpg. The next step is to assemble the images into a movie, which is done with the free ffmpeg (https://ffmpeg.org) tool. The command
ffmpeg -y -r 30 -i JPGdir/p_%03d.jpg -c:v libx264
       -pix_fmt yuv420p  Movie-a.mp4
will assemble the JPG files at a framerate of 30 images per second (option \type{-r 30}) into a QuickTime MP4 movie named \type{myMovie.mp4}.
For an overview, here's the complete script for a Unix-like system. After producing the PDF with Context (line 1), we create a temporary folder named \type{JPGdir} (line 2), convert the PDF to a series of JPG images in the created folder (line 3), create a QuickTime MP4 movie from the JPG images (lines 4-5), clean up (line 6), and finally, open the movie (line 7) :
context --once Project1-A.tex
mkdir JPGdir
convert Project1-A.pdf JPGdir/p_%03d.jpg
ffmpeg -y -r 30 -i JPGdir/p_%03d.jpg -c:v libx264
       -pix_fmt yuv420p  Movie-a.mp4
rm JPGdir/*.jpg ; rmdir JPGdir
open Project1-A.mp4
A note about the definition of the picture: although the conversion from PDF to JPG could be made at any resolution with ImageMagick, the default density is 72 dpi. This means that if the size of the PDF page is 15 inches by 15 inches (equivalent to 1080 pixels by 1080 pixels, or 38.1 cm by 38.1 cm at a definition of 72 dpi), the resulting image will also be 1080 pixels by 1080 pixels. Therefore, if the intention is to create a UHD video, add the following line at the end of the code (line 18):
currentpicture := currentpicture xysized (4096,2160);
More animated objects
Let's make things more interesting by adding more moving elements, says a lot of particles moving along several circles in a random fashion. If the positions of the animated objects are deterministic, such as a function of time ({f(time)) as shown in our first example, there is no difficulty in calculating the positions and drawing the object at these positions, something like:
 ObjectPosition := f(time) ;
 draw Object shifted ObjectPosition ;
But the introduction of randomness will complicate things a bit: the position of a particular particle at a given time (i.e., a given frame) depends on the position at a previous time. There are two solutions:
- Calculate the positions of the particles for frame one, draw the particles, update the positions at the end of the
MPPage, and continue to the next frame. The drawback is that we cannot generate any frame we need: to build frame 200, we need to draw the 199 previous frames. Advantage: memory is preserved. - Calculate the positions of all particles for all frames once, in the
MPinclusionspreamble. The advantage is that we can thereafter generate any frame we need, which can be useful for debugging for example (i.e., generate frame 10, 11, 12, or 100, 200, and 300). Drawback: all these positions take up some memory.
Let's take the second solution for simplicity. First off, let's define two tiny but useful macros; the first one gives a random random according to a uniform distribution between two limits, and the second one a random color in certain domain:
vardef ranuni(expr mini , maxi ) =
	uniformdeviate (maxi - mini) + mini
enddef ;

vardef randomcolor =
  (ranuni(0.1,0.8),ranuni(0,0.01),ranuni(0.2,0.8))
enddef ;
On each circle c (c=1,...,nbcircles), we will define some objects o (o=1,...,nbObjects[c]) (called sometimes particles here), so the total number of objects is O = nbObjects[1] + nbObjects[2]+...+nbObjects[nbcircles]. Each object o on circle c will have at time t the position Position[c][o][t]. This position, express as a number in [0,1] is a coordinate along the path ThePath[c]. The position at time 1 is chosen randomly along the path $c$ (line 13), and then will be calculated for each time t from the position at time t-1 (line 18). Each object will have its own \type{deplacement}, which depends on the length of the circle modified by random factor (line 14). Lastly, to distinguish easily particles in the following figures, we will assign a random color to each one (line 16): TheColor[c][o]
\startMPinclusions
TotalNbFrames := 300 ;

path ThePath[] , TheObject[][] ;
numeric Position[][][] ;
color TheColor[][] ;
nbcircles := 3 ;
for c=1 upto nbcircles :
  ThePath[c] := fullcircle scaled (c*20) ;
  nbObjects[c] := floor(arclength(ThePath[c])*0.05) ;
  for o=1 upto nbObjects[c] :
    TheObject[c][o] := fullcircle scaled ranuni(2,7) ;
    Position[c][o][1] := uniformdeviate(1) ;
    deplacement := (arclength(ThePath[c])/30000)
            *ranuni(0.9,1.1);
    TheColor[c][o] := randomcolor ;
    for t=2 upto TotalNbFrames :
      Position[c][o][t] :=
         Position[c][o][t-1] + deplacement;
    endfor;
  endfor;
endfor;

\stopMPinclusions
Now that all the calculations have been completed, we just need to draw these objects:
\startMPpage
currentframe := #1;

for c=1 upto nbcircles :
  draw ThePath[c] withcolor blue ;
  for o=1 upto nbObjects[c] :
    fill TheObject[c][o] shifted
      (point Position[c][o][currentframe]
      along ThePath[c])
      withcolor TheColor[c][o] ;
  endfor;
endfor;

setbounds currentpicture to TheFrame ;

\stopMPpage
Here is the movie :
We can also play with the timing of the animation (code not shown) :
and make things more interesting by adding a lot of particles..., and increase the definition : 2160x2160 :
Showcase of some movies made with MetaFun


